

If you have spent some time canoeing up north, you might have run into paddlers lugging around a heavy wooden box along for the ride. Oddly enough, the paddlers hoisted this box on their back, with a thick leather strap banded across their forehead to support the weight. Inside this mysterious box were plenty of camping treasures: pots, pans, lights, games, matches and more. This traditional piece of canoe gear is known as the wannigan or wanigan. Essentially, it is a wooden box that serves as a mini camp kitchen – storing cookware, food and goods on a canoe or snowsledding trip.

The tumplines that are used for carrying these boxes are just as interesting. They are thick and durable bands of leather that serve as a harness for these heavy boxes, and they allow the wannigans to be “tumped”. For over 200 years, wannigans have been on canoe voyages. Their use can be tracked as far back in the hands of the hardy voyageurs (french canadian fur trappers). For them however, this was not a recreational camping box, but functional storage device that they hoisted through hundreds of miles of mosquito-ridden boreal forest, day in and day out. Life for them, was certainly hard.


Today, the spirit of the wannigan is very much alive and well in all parts of canada and the northern USA. There are certain camps in Ontario that continue to use traditional equipment such as wannigans on their canoe trips. Camp Keewaydin is a fine example. At these camps, children hoist these heavy boxes with them through Canadian boreal lands as they make their way through expeditions on their own.
There are those that feel that the wannigan is impractical or just downright unnecessary in the age of waterproof plastic bins. Love them or hate them, I believe that wannigans help remind us to exercise a little bit more caution on canoe trips. They remind us of the history of canoeing in Canada and serve as an important link to our past.
I’ve always wanted to build one to for the family and to keep traditional way of canoe camping alive. More importantly, I wanted something to build and share lasting memories for the kids.
Step 1: The design

The most important part of designing your wannigan is building one that actually fits your canoe! Since most canoe hulls are pretty close in size, the dimensions of all wannigans are relatively similar. Most wannigans are simple box designs, although there are some out there that are actually curved to the hull of the canoe.
Most wannigans are stained after their completion in a wood stain of one’s choice. I decided I wanted to create on in a more artisan fashion. In keeping with the tradition of this old piece of gear and the history of canoeing in Canada, I decided to paint this wannigan in the tradition of the Hudson’s Bay company. Known as one of the greatest companies in the world, this British company played an integral role in shaping the landscape of Canada and the fur trade. I always thought the classic Hudson’s Bay color scheme looked pretty cool. Basically plain white, with stripes of indigo, yellow, red and green, in that order. This color scheme and pattern was originally used on the Hudson’s Bay “Point Blanket”. This wool blanket was sold during the 1700 and 1800s and an item frequently traded with amongst First Nations people. The “point” system was a series of black lines at the corner of each blanket along the selvage. The number of lines would indicate how large the blanket was when it was unfolded. The pattern and design is seen today on numerous Hudson’s Bay Company goods, such as mugs, clothes, towels, canoes and even stuff animals.
If you are interested in learning more about the Hudson’s Bay Company, here are two great links.
Most wannigans have a lid that is flush with the sides, making the outline an even box. My brother created a wannigan in this style and we noticed that on trips with heavy rainfall, the wannigan actually started collecting water inside. To combat this problem, he cleverly sewed a Hudson Bay flag skirt for the wannigan which eventually worked to keep things dry. I decided in my design that I wanted to avoid this problem all together. I was going to make a lid that was slightly larger than the dimensions of my main compartment.

Creating a lid with a lip, would also allow me to wood burn a chessboard on the under surface to play during rainy day under the tarp or by campfire at night. The lip, would work to naturally keep the chess pieces from falling off the sides.
Step 2: The frame
I wanted to create a wannigan that did not have any metal screws. This one is held together by it’s joints as well as occasional wooden pegs and of course wood glue. The the large sides are from plywood and the ends are pine. While constructing the box, it certainly helps to invest in several large clamps at the ready. I subsequently applied several layers of colonial maple wood stain on the wannigan.


Step 4: The fiberglass.
 While some May consider this next step to be unnecessary, I knew it would add many benefits. Yes, I’m talking about adding a layer of fiberglass on the inside of the wannigan. This layer would not only strengthen the box, but would also make the inside waterproof – also making spills infinitely easier to clean. I’ve never worked with fiberglass or epoxy resin for that matter and this proved to be the most challenging step. One thing I learned was to mix small batches! In larger quantities I found that the epoxy and resin once mixed generated a lot of heat and solidified very quickly. It is of utmost importance to mix as accurate ratios as instructed as possible. This is a messy business so make sure you’re protected and working in a well ventilated area.
Step 4: Wood-burning
This was one of my favorite parts of the project. With the help of my brother, we tracked down several hudson bay logos on the internet. I was looking for one that was actually NOT as finely detailed because that would prove to be much more difficult to burn. Once you are satisfied with your design, print the logo out in “reverse”. From there, I used the hot pen and a flat surface to heat the paper and ink onto the wood. This would allow just enough ink transfer onto the wood so you can burn your design into it. I noticed that woodburning is not as easy on a softwood such as pine. Woodburning the cheeseboard also proved to be quite laborious however still enjoyable.


Step 4: The painting

This process actually took the longest. To ensure that the white was actually as “white” as it could be with clean stripes, I had to make some careful preparations. First off, it is critical to use a primer before the paint to soak up any stain. I gave this layer of primer a full 24 hours to dry, I wanted to prevent any peeling of paint because I was going to be using a lot of paint tape. After it was completely dried, I applied 3 coats of white paint, latex, and water based. Once this layer was completely dried I carefully taped the areas that would be striped. To make sure that the colored stripes would NOT BLEED ONTO the white paint, I actually painted OVER the taped margins with white paint to fill any possible micro gaps and for capillary action to soak up any potential paint. This is a CRITICAL STEP.


Step 5: The finish
Choosing the finish was actually more difficult than I thought. Typically, for any stained wood surface, you have a variety of options. For something that is going to brave the elements, you want it to be UV protected as well as water resistant. For such purposes, marine spar varnish (an oil base) is usually preferred. I realized that my project was different than just stained wood…I was working with stained wood as well as carefully painted pattern with a mostly white background. The pure white color posed an issue. Most spar varnishes will actually YELLOW the white. 
I had to search for quite some time before I was able to find the finish that would NOT stain the white. It was a water based spar varnish that particularly says: “no yellowing”, make sure you look for that statement, because there are plenty of water based varnishes that will actually YELLOW your project. Believe me, you do not want to sand and re apply the finish. Another method is to have a sample test piece of wood that you can test the finish on. The water based varnish dries very quickly so you have to work relatively fast. Once the coat is totally dry, usually in about 3 hours, VERY gently run a 400 grit sandpaper over the surface to remove any bumps that may have developed. You ARE NOT sanding at this point, it is a VERY gentle grazing with the sandpaper. I ended up applying 5 coats of water based varnish to the wannigan.
Step 6: The tumpline

Another piece of traditional canoe wear, is the tumpline. Classically this Is a piece of leather strap that is tied to the canoe or waningan to assist in carrying and distributing the weight. The broad band of leather is placed over the forehead and the load is rested on the upper back. It sounds like an unusual way to carry loads but it actually works to help ease weight from the shoulders.
you can virtually use any type of rope for the tumpline but I wanted this thing to last the years and also to be crafted in the traditional sense. I purchased a leather tumpline from “Pole and Paddle” for $85. A bit pricey but worth it in terms of quality.


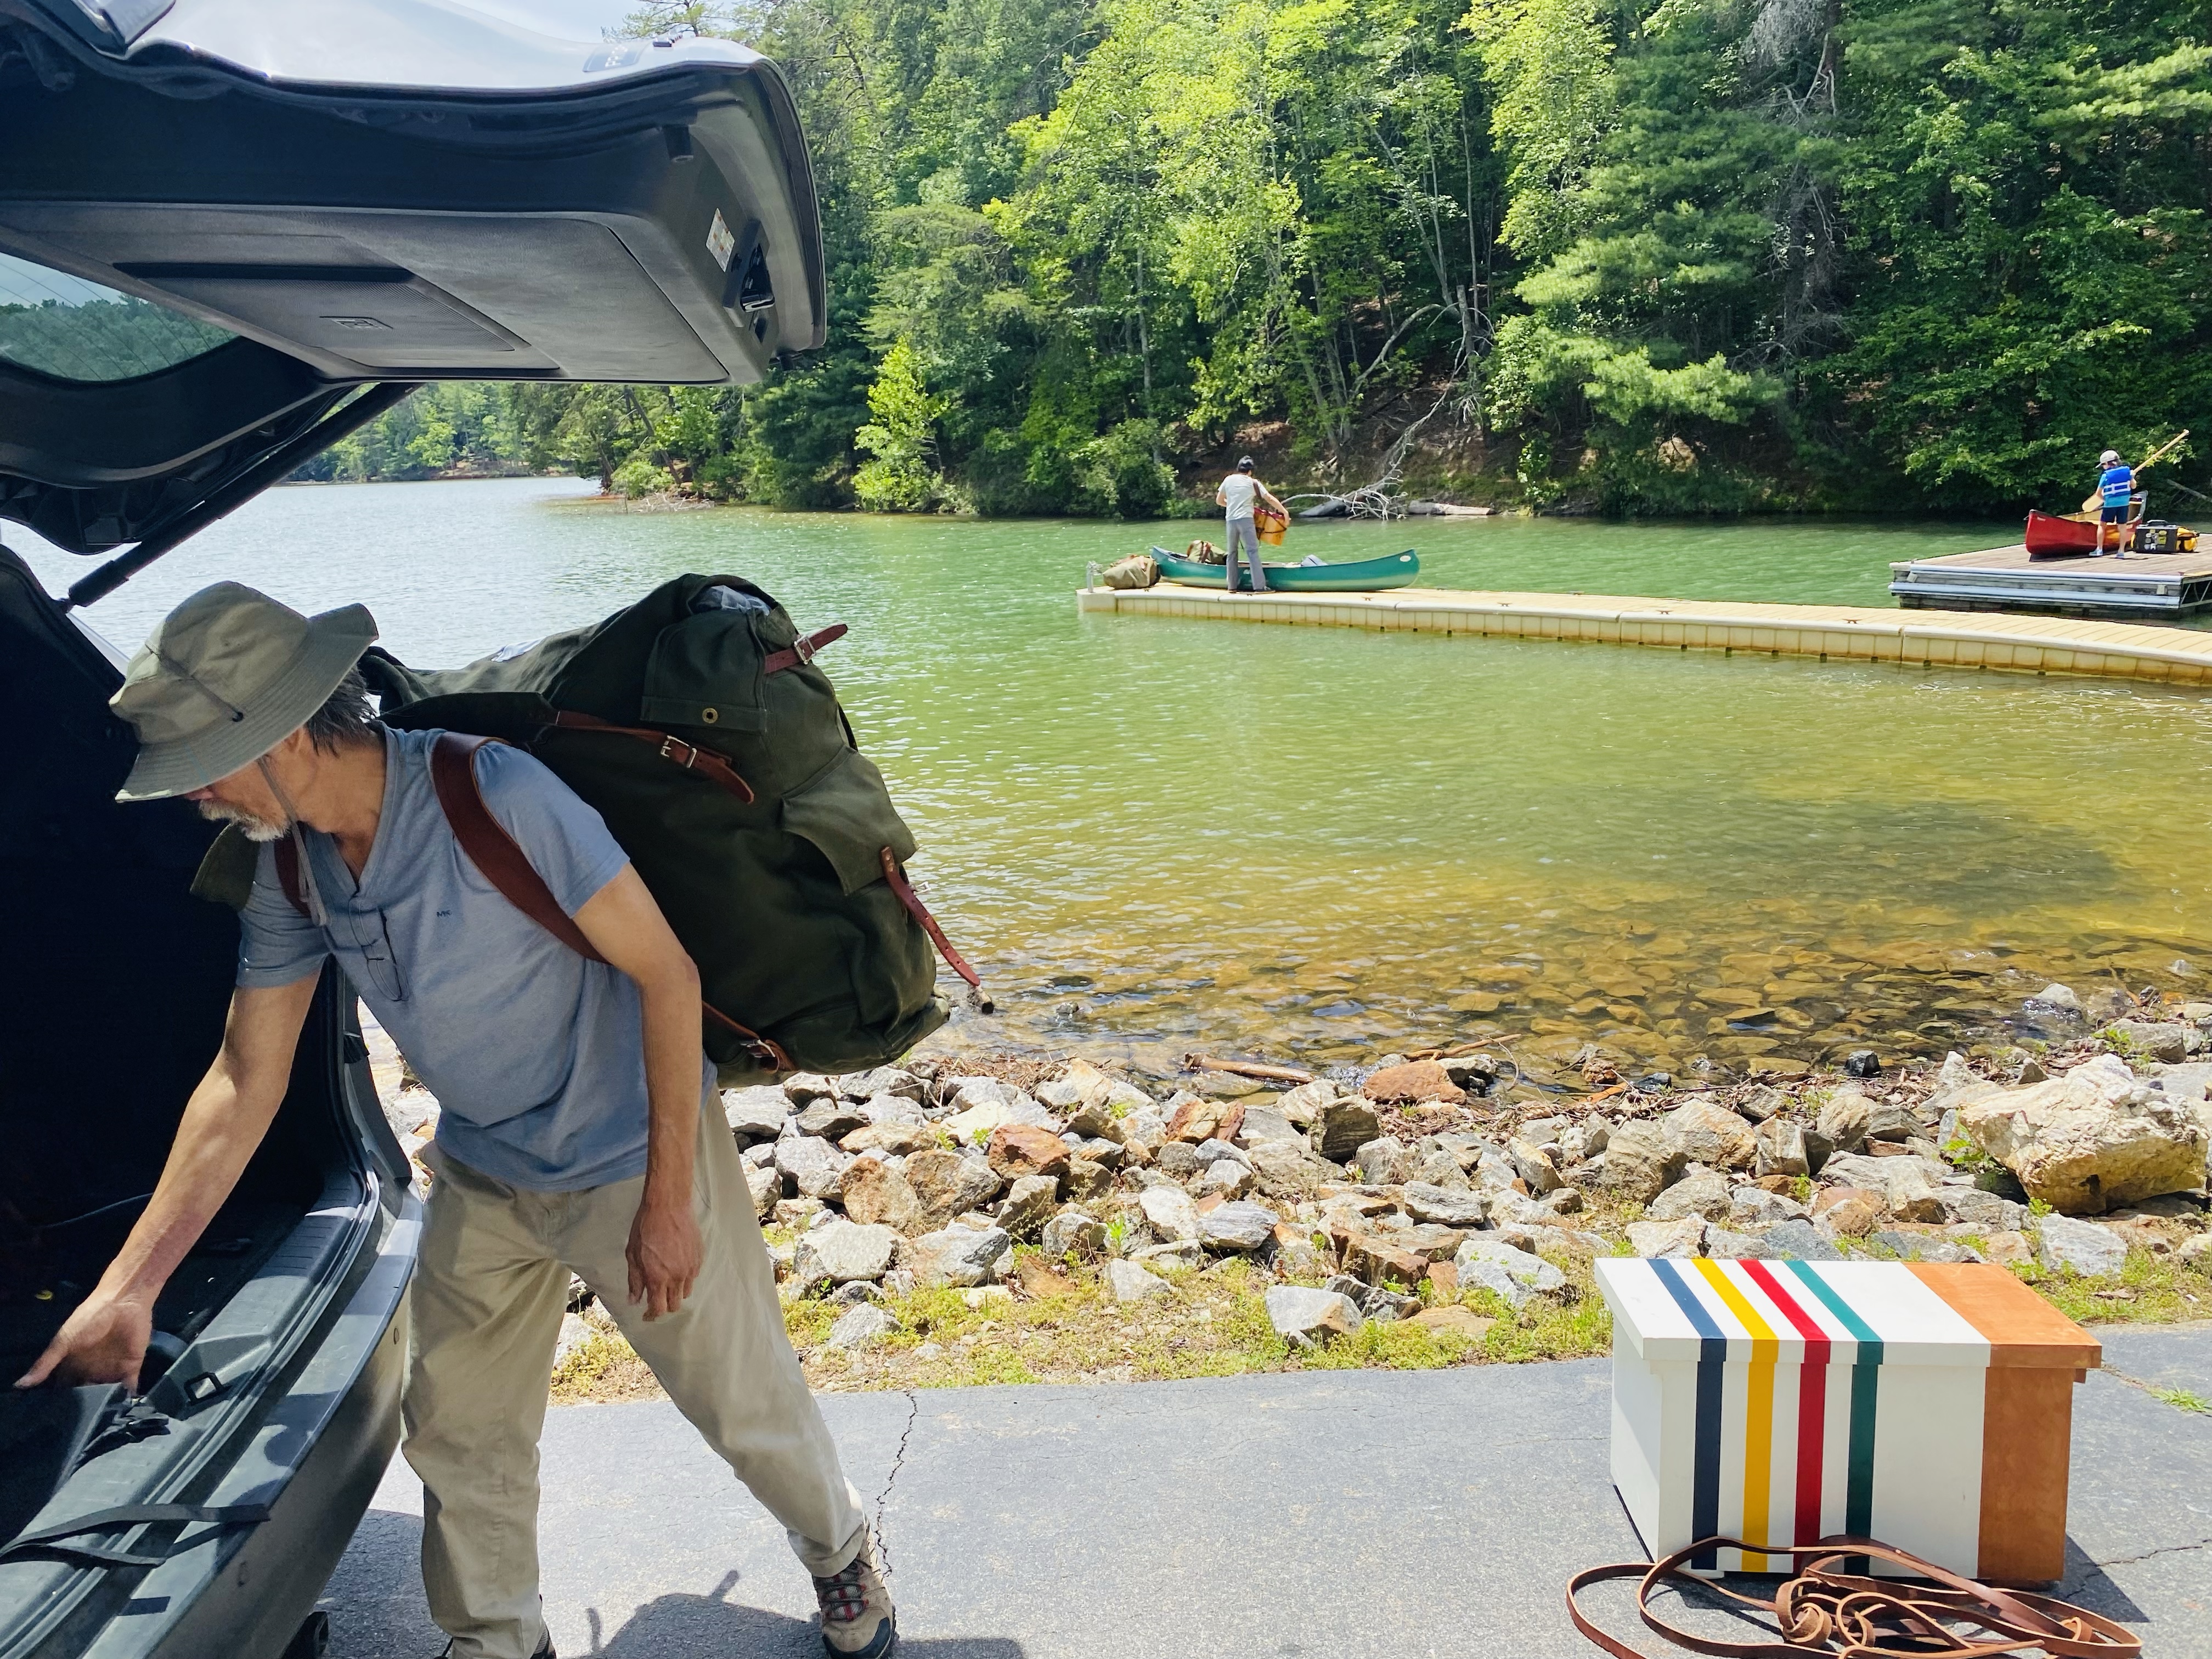
The wannigan is taken on its maiden voyage to Lake Moomaw, Bath County in Virginia.


Conclusion:
As with most projects, the construction of this wannigan, turned out to be a much larger task than expected! I certainly don’t consider myself a woodworker but I tackled this project to also learn more about the craft. I was happy that I got my first experience with epoxy resin and fiber glass. I also have a much larger respect for the construction of a level and even box! I also got to try wood burning for the first time. All of these skills will come in handy in the future for bigger projects. At the end of the day, I was certainly glad that I built it. Although large, difficult to carry and heavy…….a canoe trip just wouldn’t be the same without this treasure chest. When you are out in the middle of boreal forest, with the water lapping on the sides of your canoe, and the distant calls of the loon fill the air, it brings me great satisfaction to know that I have a trusty kitchen with me, filled with tools, games and memories.
As I stare at this untouched wannigan, I wonder where this box will take us? How many seasons will it last? How many lakes will it see? how many portages shall it endure? and what adventures lie ahead? Only time will tell….

This was so much fun to read! What a great tradition to uphold. Maggie
LikeLike
Thanks much Maggie! Have a wonderful holiday season!
LikeLike
I built several wanigans more than 35 years ago for a summer camp. We simplified the design to 1/4 inch plywood with birch 3/4 by 3/4 frame and a simple lid that fit on top. We sewed up some 1 inch nylon webbing with fastex buckles to shut them and then tied leather tumplines on. Our first was too large and it could be come too heavy with loaded so we reduced size for next 5. They were used for 20 years before they were replaced. It was amazing how durable those simple wooden boxes were and how they saved our kitchen pot sets from getting banged up.
LikeLiked by 1 person
Thanks for checking in Doug, I think I’m definitely going to lighten my next one in the future! We love wannigans!
LikeLike
Thanks for sharing Doug! That’s amazing that they stood up to the elements for that long! long live wannigans.
LikeLike
I’ve been canoeing all my life, but never heard of a wannigan. Guess it’s because I’m not Canadian (although I’m close: Minnesota). What a beautiful box! We are the proud owners of two Hudson Bay blankets at home.
LikeLike